ASP.Net Web Developer Guide |
||||||||
|
||||||||
Sitemap : Content in Chapter 1 |
Content in Chapter 2 |
Content in Chapter 3 |
||||||||
|
||||||||


Wednesday, March 29, 2006
Exposing Properties of a User Control
We can develop user controls to encapsulate standard business processes. A user control is essentially a visual component (almost like ActiveX controls and visual JavaBeans), except that it is much easier to develop. Once we develop the component, it can be plugged in many applications, thereby making it easy for the front-end application developers. More importantly, it provides the mechanism to implement standard business processes and maintain their integrity.
We will illustrate this concept with an example. In this example, we will encapsulate a simple business rule for computing gross wage.The interesting feature of this control is that it will pass the result of its computation to the host page for further processing. It will also accept a title from the host page and display it within itself.That means we will provide two-way communication between the control and the host page.The run-time view of the control when hosted in a page is shown in Figure 3.92.
Figure 3.92 Exposing Properties of a User Control

posted by Mr.Q at 5:16 AM
0 comments
![]()
![]()
Creating a Simple Web User Control
Suppose that we want to build the control as shown in Figure 3.88. If a host page embeds this control, it will automatically display the current time in the server’s time zone. Once we build this control, we can use it in any subsequent page.We will provide a step-by-step procedure to build this control.
Figure 3.88 A Sample User Control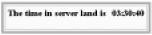
- Develop the necessary code for the control.The code for this example is shown in Figure 3.89.The code is essentially very simple.We are using use a <table> tag with an embedded <asp:Label> control. In the Page_Load event, we will display the current time in the label.
Figure 3.89 The Code for the User Control (TimeUserControl.ascx)
<!— Chapter3/TimeUserControl.ascx —>
<table border ="5" cellpadding="5" rules="none"
bgcolor="lightyellow" bordercolor="orange">
<tr valign="middle"><td><h3>The time in server land is</h3></td>
<td><h3><asp:Label id="lblDateTime" runat="server"/></h3></td>
</tr>
</table>
<script Language="vb" runat ="server">
Sub Page_Load(s As Object, e As EventArgs)
If Not Page.IsPostBack Then
' lblDateTime.Text=System.DateTime.Now.ToLongTimeString()
lblDateTime.Text=Format(Now,"hh:mm:ss")
End If
End Sub
</script> - Save the code with an extension of *.ascx in your virtual directory.
- Test the User Control: A control cannot be tested unless it is hosted in an ASPX page.Thus, start a new page, and enter the code shown in Figure 3.90. First, a host page needs to register a user control using the Register directive.The Register directive has three major attributes.We provide a prefix in the tagprefix attribute (it can be any prefix of your choice).Then we need to provide a name of the registered control in the tagname attribute. Finally, we must also specify the name of the source code (of the .ascx file) using the Src attribute. Can you believe that you are done? Go ahead and open the page in your browser.You will see a page very similar to the one shown in Figure 3.91.
Figure 3.90 Testing the User Control (TestTimeUserCntrol1.aspx)
<!— Chapter3/TestTimeUserControl1.aspx —>
<%@ Register tagprefix ="utoledo" tagname="Time"
Src="TimeUserControl.ascx" %>
<html><head></head><form><body>
<b>I am a host page. Suppose that I don't know how to show the time.
Hence, I will use the TimeUserControl. I am using an instance of the
TimeUserControl below:<p>
<utoledo:Time runat="server" /><br/>
Now I can do my other work... <b/>
</body></form></html>
Figure 3.91 Using a User Control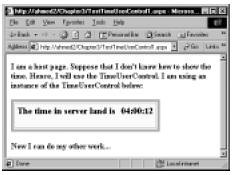
posted by Mr.Q at 5:13 AM
1 comments
![]()
![]()
Creating Custom ASP Server User Controls
posted by Mr.Q at 4:32 AM
0 comments
![]()
![]()
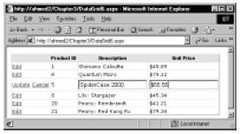
Providing Data Editing Capability in a DataGrid Control
Figure 3.86 Editing Data in a DataGrid Control
DataKeyField="ProductId" OnEditCommand="setEditMode"
OnCancelCommand="cancelEdit" OnUpdateCommand="updateDataBase"
As you can see from the previous code, we have set the OnEditCommand property to a subprocedure named setEditMode.When we specify such a property, the data grid automatically places a ButtonList control captioned as “Edit” in the first column of the displayed table. On the click of this ButtonList, the control triggers the OnEditCommandEvent and passes a DataGridCommandEventArgs parameter to the wired-up event procedure (in this case, to the setEditMode procedure). In our setEditMode subprocedure, we have simply placed the clicked row in the edit mode as follows:
Sub setEditMode(s As Object, e As DataGridCommandEventArgs)
dataGrid1.EditItemIndex= e.Item.ItemIndex
bindDataGrid
End Sub
When the Edit button is clicked, the data grid also displays the Update and Cancel buttons automatically. Furthermore, the editable columns in the clicked row (item) are replaced with textboxes.The user can enter appropriate data in these textboxes and subsequently click the Update or Cancel button.
Second, on the click event of the Update button, we need to update the database. But how would we know which record in the database to update? This is why we have used the DataKeyField property (in the DataGrid tag) to identify the ProductId field as the key field. Our primary objective is to prepare an appropriate SQL Update statement like UPDATE Products SET ProductName=‘givenName’, Price=‘givenPrice’ WHERE ProductID=‘selectedProductId’.When the Update procedure is triggered, it is passed with a DataGridCommandEnentArgs-type parameter.We can retrieve the key value of the clicked row as dataGrid1.EditItemIndex= e.Item.ItemIndex.
Getting the value of the key field is not enough.We will also have to know the new values of the other edited columns.The desired values can be retrieved using the DataGridCommandEventArgs, too. For example, the ProductName field happens to be the second cell of the selected row.The Controls(0) of a given Cell of an Item object contains the value. But the parameter was passed to the routine as an object.Thus, we need to cast the Controls(0) to a textbox type, so that we can extract its Text data.The following statement will capture the new data in the ProductName column and will place it in a string varianble. Once we have done all these things, it is just a matter of building the necessary SQL string for the appropriate UPDATE query.
strPName=(CType(e.Item.Cells(2).Controls(0), Textbox)).Text
An UPDATE query is typically executed by using the ExecuteNonQuery method of a Command object (to be learned in the database chapter).This is what we did here. Finally, we need to set the edit-mode off.We have done this with the dataGrid1.EditItemIndex= –1 statement. Obviously, we do not want the user to edit the primary key.Therefore, we have set the ReadOnly property of the ProductID column to True.
Figure 3.87 Editing in DataGrid (DataGrid6.aspx)
<!— Chapter3/DataGrid6.aspx —>
<%@ Import Namespace="System.Data" %>
<%@ Import Namespace="System.Data.OleDb" %>
<script language="VB" Debug="true" runat="server">
Sub Page_Load(Source As Object, E As EventArgs)
If Not IsPostBack Then
bindDataGrid
End If
End Sub
Sub bindDataGrid
Dim myConn As OleDbConnection
Dim myOleDbAdapter As OleDbDataAdapter
Dim connStr, sqlStr As String
Dim myDataSet As New Dataset
connStr="Provider=Microsoft.Jet.OLEDB.4.0; Data Source=D:\Products.mdb"
sqlStr="SELECT ProductId, ProductName, Price " _
+ " FROM Products WHERE Price > 40 ORDER BY ProductId"
myConn= New OleDbConnection(connStr)
myConn.Open()
myOleDbAdapter =New OleDbDataAdapter(sqlStr,myConn)
myOleDbAdapter.Fill(myDataSet,"dtProducts")
dataGrid1.DataSource=myDataSet.Tables("dtProducts")
dataGrid1.DataBind()
myConn.Close()
End Sub
Sub setEditMode(s As Object, e As DataGridCommandEventArgs)
dataGrid1.EditItemIndex= e.Item.ItemIndex
bindDataGrid
End Sub
Sub cancelEdit(s As Object, e As DataGridCommandEventArgs)
dataGrid1.EditItemIndex=-1
bindDataGrid
End Sub
Sub updateDatabase(s as Object, e As DataGridCommandEventArgs)
Dim myConn As OleDbConnection
Dim connStr, sqlStr, strPName As String
Dim myUpdateCommand As OleDbCommand
Dim intPid As Integer
Dim dblPrice As Double
' Get the key-value of the clicked row
intPid=dataGrid1.DataKeys.Item(e.Item.ItemIndex)
' Get the new value of ProductName
strPName=(CType(e.Item.Cells(2).Controls(0), Textbox)).Text
' Get the new value of Price
dblPrice=cDbl((CType(e.Item.Cells(3).Controls(0), Textbox)).Text)
' Build the SQL
sqlStr="UPDATE Products SET ProductName=' " + strPName _
+ " ', Price=" + dblPrice.ToString _
+ " WHERE ProductID=" + intPid.ToString
connStr="Provider=Microsoft.Jet.OLEDB.4.0;Data Source=D:\Products.mdb"
myConn= New OleDbConnection(connStr)
myConn.Open()
myUpdateCommand=New OleDbCommand(sqlStr, myConn)
' Execute the Update SQL statement
myUpdateCommand.ExecuteNonQuery
myConn.Close()
dataGrid1.EditItemIndex=-1
BindDataGrid
End Sub
</script>
<html><head></head><form runat="server">
<asp:DataGrid id="dataGrid1" AutoGenerateColumns="False"
DataKeyField="ProductId" OnEditCommand="setEditMode"
OnCancelCommand="cancelEdit" OnUpdateCommand="updateDataBase"
CellPadding="2" Font-Name="Verdana" Font-Size="8pt" runat="server">
<HeaderStyle Font-Size="8" Font-Names="Arial" Font-Bold="True"
BackColor="Yellow" HorizontalAlign="center"></HeaderStyle>
<Columns>
<asp:EditCommandColumn EditText="Edit"
UpdateText="Update" CancelText="Cancel">
</asp:EditCommandColumn>
<asp:BoundColumn HeaderText="Product ID" DataField="ProductId"
ReadOnly="True" />
<asp:BoundColumn HeaderText="Description" DataField="ProductName"/>
<asp:BoundColumn HeaderText="Unit Price" DataField="price"
DataFormatString="{0:c}" />
</Columns>
</asp:DataGrid></form></html>
posted by Mr.Q at 4:30 AM
0 comments
![]()
![]()
Navigating to a Selected Page
AllowPaging="true" PageSize="5" PagerStyle-Mode="NumericPages"
PagerStyle-HorizontalAlign="Center" OnPageIndexChanged="doPaging"
Figure 3.84 Paging in a DataGrid Control
<!— Chapter3/DataGrid5.aspx —>
<%@ Page Language="VB" Debug="true" %>
<%@ Import Namespace="System.Data" %>
<%@ Import Namespace="System.Data.OleDb" %>
<script language="VB" Debug="true" runat="server">
Sub Page_Load(Source As Object, E As EventArgs)
If Not IsPostBack Then
bindDataGrid
End If
End Sub
Sub bindDataGrid
Dim myConn As OleDbConnection
Dim myOleDbAdapter As OleDbDataAdapter
Dim connStr, sqlStr As String
Dim myDataSet As New Dataset
connStr="Provider=Microsoft.Jet.OLEDB.4.0; " _
+ "Data Source=D:\Products.mdb"
sqlStr="SELECT ProductId, ProductName, Price " _
+ "FROM Products ORDER BY ProductId"
myConn= New OleDbConnection(connStr)
myConn.Open()
myOleDbAdapter =New OleDbDataAdapter(sqlStr,myConn)
myOleDbAdapter.Fill(myDataSet,"dtProducts")
dataGrid1.DataSource=myDataSet.Tables("dtProducts")
dataGrid1.DataBind()
myConn.Close()
End Sub
Sub doPaging(s As Object, e As DataGridPageChangedEventArgs)
dataGrid1.CurrentPageIndex=e.NewPageIndex
bindDataGrid
End Sub
</script>
<html><head></head><form runat="server">
<asp:DataGrid runat="server" id="dataGrid1" AutoGenerateColumns="true"
AllowPaging="true" PageSize="5" PagerStyle-Mode="NumericPages"
PagerStyle-HorizontalAlign="Center" OnPageIndexChanged="doPaging"
BackColor="White" BorderWidth="1px" BorderStyle="Solid"
Width="100%" BorderColor="Salmon" CellPadding="2" CellSpacing="0"
Font-Name="Verdana" Font-Size="8pt">
<HeaderStyle Font-Size="8" Font-Names="Arial" Font-Bold="True"
BackColor="Yellow" HorizontalAlign="center">
</HeaderStyle>
<AlternatingItemStyle BackColor="Beige"/>
</asp:DataGrid>
</center></form></html>
posted by Mr.Q at 4:25 AM
0 comments
![]()
![]()
Providing Paging in DataGrid
Using Previous Page and Next Page Icons
The run-time view of this application is shown Figure 3.82.To accomplish the paging, we have set the following properties of the data grid:
- AllowPaging=“true”
- PageSize=“5”
- PagerStyle-HorizontalAlign=“Center”
- OnPageIndexChanged=“doPaging”
The data grid automatically generates the previous page and next page icons. When any one of these icons is clicked, the doPaging subprocedure is triggered. The click event passes a DataGridPageChangedEventArgs parameter to the subprocedure. In the doPaging procedure we have set the currentPageIndex property of the data grid to the newPageIndex property of this parameter.Then we issued a call to the bindDataGrid procedure as shown in the following code excerpt.The complete code for this application is shown in Figure 3.83 and can be found on the CD that accompanies this book in the file named DataGrid4.aspx.
Sub doPaging(s As Object, e As DataGridPageChangedEventArgs)
dataGrid1.CurrentPageIndex=e.NewPageIndex
bindDataGrid
End Sub
Figure 3.83 DataGrid4.aspx
<!— Chapter3/DataGrid4.aspx —>
<%@ Page Language="VB" Debug="true" %>
<%@ Import Namespace="System.Data" %>
<%@ Import Namespace="System.Data.OleDb" %>
<script language="VB" Debug="true" runat="server">
Sub Page_Load(Source As Object, E As EventArgs)
If Not IsPostBack Then
bindDataGrid
End If
End Sub
Sub bindDataGrid
Dim myConn As OleDbConnection
Dim myOleDbAdapter As OleDbDataAdapter
Dim connStr, sqlStr As String
Dim myDataSet As New Dataset
connStr="Provider=Microsoft.Jet.OLEDB.4.0; " _
+ "Data Source=D:\Products.mdb"
sqlStr="SELECT ProductId, ProductName, Price " _
+ "FROM Products ORDER BY ProductId"
myConn= New OleDbConnection(connStr)
myConn.Open()
myOleDbAdapter=New OleDbDataAdapter(sqlStr,myConn)
myOleDbAdapter.Fill(myDataSet,"dtProducts")
dataGrid1.DataSource=myDataSet.Tables("dtProducts")
dataGrid1.DataBind()
myConn.Close()
End Sub
Sub doPaging(s As Object, e As DataGridPageChangedEventArgs)
dataGrid1.CurrentPageIndex=e.NewPageIndex
bindDataGrid
End Sub
</script>
<html><head></head><form runat="server">
<asp:DataGrid runat="server" id="dataGrid1" AutoGenerateColumns="true"
AllowPaging="true" PageSize="5" PagerStyle-HorizontalAlign="Center"
OnPageIndexChanged="doPaging" BackColor="White" BorderWidth="1px"
BorderStyle="Solid" Width="100%" BorderColor="Salmon"
CellPadding="2" CellSpacing="0" Font-Name="Verdana" Font-Size="8pt">
<HeaderStyle Font-Size="8" Font-Names="Arial" Font-Bold="True"
BackColor="Yellow" HorizontalAlign="center">
</HeaderStyle>
<AlternatingItemStyle BackColor="Beige"/>
</asp:DataGrid>
</center></form></html>
posted by Mr.Q at 2:57 AM
0 comments
![]()
![]()
Tuesday, March 28, 2006
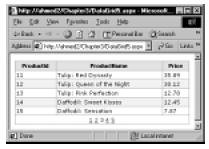
Sorting DataGrid
Figure 3.80 Sorting Data in a DataGrid Control
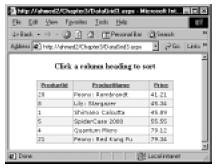
The code for this application is shown in Figure 3.81. On the click event of a column header, our intention is to exploit the SQL’s ORDER BY clause to perform the sorting.This forces us to recreate the data set and subsequently to rebind the data grid. Please observe that we have designed the bindDataGrid routine slightly differently from the similar procedures in our previous examples.We included an optional parameter to this procedure so that we can pass a column name when we call this routine.This subprocedure will then extract the data from the database in the ascending order of the passed column. In the DataGrid tag, we have specified its AllowSorting property to be true. We have also set its OnSortCommand to a subprocedure named sortGrid. On the click event of any of the column header, the sortGrid subprocedure will be called.
Figure 3.81 DataGrid3.aspx
<!— Chapter3/DataGrid3.aspx —>
<%@ Page Language="VB" Debug="true" %>
<%@ Import Namespace="System.Data" %>
<%@ Import Namespace="System.Data.OleDb" %>
<script language="VB" Debug="true" runat="server">
Sub Page_Load(Source As Object, E As EventArgs)
If Not IsPostBack Then
bindDataGrid
End If
End Sub
Sub bindDataGrid(Optional sortField As String="ProductId")
Dim myConn As OleDbConnection
Dim myOleDbAdapter As OleDbDataAdapter
Dim connStr, sqlStr As String
Dim myDataSet As New Dataset
connStr="Provider=Microsoft.Jet.OLEDB.4.0;Data Source=D:\Products.mdb"
sqlStr="SELECT ProductId, ProductName, Price " _
+ " FROM Products WHERE Price > 40 ORDER BY " +
sortField
myConn= New OleDbConnection(connStr)
myConn.Open()
myOleDbAdapter =New OleDbDataAdapter(sqlStr,myConn)
myOleDbAdapter.Fill(myDataSet,"dtProducts")
dataGrid1.DataSource=myDataSet.Tables("dtProducts")
dataGrid1.DataBind()
myConn.Close()
End Sub
Sub sortGrid(s As Object, e As DataGridSortCommandEventArgs)
bindDataGrid(e.sortExpression)
End Sub
</script>
<html><head></head><body><form runat="server"><center>
<h4>Click a column heading to sort</h4>
<asp:DataGrid runat="server" id="dataGrid1"
AutoGenerateColumns="true"
AllowSorting="true"
OnSortCommand="sortGrid"
Width="75%"
BackColor="White"
BorderWidth="1px" BorderStyle="Solid"
CellPadding="2" CellSpacing="0"
BorderColor="Salmon"
Font-Name="Verdana" Font-Size="8pt">
<HeaderStyle Font-Size="8" Font-Names="Arial"
Font-Bold="True" BackColor="Yellow"
HorizontalAlign="center">
</HeaderStyle>
<AlternatingItemStyle BackColor="Beige"/>
</asp:DataGrid>
</center></form></body></html>
posted by Mr.Q at 10:28 PM
0 comments
![]()
![]()
Displaying Formatted Data with Styles
Figure 3.78 Displaying Formatted Data with Styles

First, we have to set the AutoGenerateColumn property to False to suppress the automatic generation of the columns in the DataGrid.The DataGrid has a <Column> collection property. Inside the <Column> tag, we can include the column names of the desired columns using the <BoundColumn> property.We do not have to necessarily include all of the columns, and we can list the columns in the desired order.The necessary formatting instructions for a column can be specified inside the <BoundColumn> tag.We can also include the <ItemStyle> property of a <BoundColumn> object to specify the alignment of the text. For example, we have formatted the Price column as follows:
<asp:BoundColumn HeaderText="Unit Price" DataField="price"
DataFormatString="{0:c}">
<ItemStyle HorizontalAlign="Right"/>
</asp:BoundColumn>
We have used the <HeaderStyle> property to define the look of the header. Finally, the <AlternatingItemStyle> property has been used to display the rows in alternating background colors.The complete code for this application is shown in Figure 3.79
Figure 3.79 DataGrid2.aspx
<!— Chapter3/DataGrid2.aspx —>
<%@ Import Namespace="System.Data" %>
<%@ Import Namespace="System.Data.OleDb" %>
<html><head></head>
<script language="VB" Debug="true" runat="server">
Sub Page_Load(Source As Object, E As EventArgs)
If Not IsPostBack Then
bindListControl
End If
End Sub
Sub bindListControl()
Dim myConn As OleDbConnection
Dim myOleDbAdapter As OleDbDataAdapter
Dim myDataSet As New DataSet
Dim connStr, sqlStr As String
connStr="Provider=Microsoft.Jet.OLEDB.4.0;Data Source=D:\Products.mdb"
sqlStr="SELECT ProductId, ProductName, Price " _
+ " FROM Products WHERE Price > 40 ORDER BY Price"
myConn= New OleDbConnection(connStr)
myConn.Open()
myOleDbAdapter =New OleDbDataAdapter(sqlStr,myConn)
myOleDbAdapter.Fill(myDataSet,"dtProducts")
DataGrid1.DataSource=myDataSet.Tables("dtProducts")
DataGrid1.DataBind()
myConn.Close()
End Sub
</script>
<asp:DataGrid runat="server" id="DataGrid1" AutoGenerateColumns="false"
Width="75%" BackColor="White" BorderWidth="1px" BorderStyle="Solid"
CellPadding="2" CellSpacing="0" BorderColor="Salmon"
Font-Name="Verdana" Font-Size="8pt">
<HeaderStyle Font-Size="8" Font-Names="Arial" Font-Bold="True"
BackColor="Yellow" HorizontalAlign="center">
</HeaderStyle>
<Columns>
<asp:BoundColumn HeaderText="Product ID" DataField="ProductId" >
<ItemStyle HorizontalAlign="Right"/>
</asp:BoundColumn>
<asp:BoundColumn HeaderText="Unit Price" DataField="price"
DataFormatString="{0:c}">
<ItemStyle HorizontalAlign="Right"/>
</asp:BoundColumn>
<asp:BoundColumn HeaderText="Description" DataField="ProductName">
<ItemStyle Width="130"/>
</asp:BoundColumn>
</Columns>
<AlternatingItemStyle BackColor="Beige"/>
</asp:DataGrid>
</center></body></html>
posted by Mr.Q at 9:48 PM
0 comments
![]()
![]()
Displaying Data in a DataGrid Control Using Default Column Mapping
<asp:DataGrid id="dataGrid1" runat="server" />
Figure 3.76 Displaying Data in a DataGrid Control
The complete listing of the application is shown in Figure 3.77.
Figure 3.77 DataGrid1.aspx
<!— Chapter3/DataGrid1.aspx —>
<%@ Import Namespace="System.Data" %>
<%@ Import Namespace="System.Data.OleDb" %>
<html><head></head>
<script language="VB" Debug="true" runat="server">
Sub Page_Load(Source As Object, E As EventArgs)
If Not IsPostBack Then
bindListControl
End If
End Sub
Sub bindListControl()
Dim myConn As OleDbConnection
Dim myOleDbAdapter As OleDbDataAdapter
Dim connStr, sqlStr As String
Dim myDataSet As New Dataset
connStr="Provider=Microsoft.Jet.OLEDB.4.0;Data Source=D:\Products.mdb"
sqlStr="SELECT ProductId, ProductName, Price " _
+ "FROM Products WHERE Price > 40 ORDER BY Price"
myConn= New OleDbConnection(connStr)
myConn.Open()
myOleDbAdapter =New OleDbDataAdapter(sqlStr,myConn)
myOleDbAdapter.Fill(myDataSet,"dtProducts")
DataGrid1.DataSource=myDataSet.Tables("dtProducts")
DataGrid1.DataBind()
myConn.Close()
End Sub
</script>
<body bgcolor="white">
<asp:DataGrid id="dataGrid1" runat="server" />
</center></body></html>
posted by Mr.Q at 9:15 PM
0 comments
![]()
![]()
Using the DataGrid Control (Chapter 3)
Essentially, a DataGrid control can be used to display bound data in tabular format. Each record in the data source is displayed as a row in the grid. By default, the data grid maps each field of the data source as a column in the grid. Obviously, we may override the default value of its AutoGenerateColumn property to display selected columns in a particular order. In this section, we will present five examples to demonstrate various features of a DataGrid.
posted by Mr.Q at 8:41 AM
0 comments
![]()
![]()
Capturing Selected Items in a DataList Control (Chapter 3)
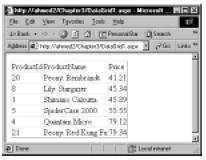
Figure 3.74 Capturing Selected Items in a DataList Control
The definition of the DataList is itself very simple.We have included the OnItemCommand attribute of the DataList to the showSelection procedure, as follows:
<asp:DataList id="dataList1" gridlines="both" cellpadding="10"
RepeatColumns="3" RepeatDirection="Horizontal"
onItemCommand="showSelection"
runat="server">
Subsequently, we have embedded a LinkButton control in the ItemTemplate of the DataList. On the click event of this LinkButton, it will send the ProductName as the CommandArgument to the showSelection function.These are accomplished as follows:
<ItemTemplate>:
<asp:LinkButton id="myLinkBtns"
text='<%# Container.DataItem( "ProductName" )%>'
CommandArgument='<%# Container.DataItem( "ProductName" )%>'
runat ="server"/>
</ItemTemplate>
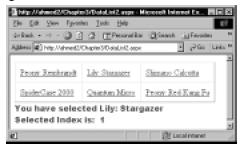
In the showSelection procedure, we are simply displaying the desired information as shown in the following code excerpt:
Sub showSelection(s As Object, e As DataListCommandEventArgs)
lblSelectedIndex.Text ="Selected Index is: " + " " + _
e.Item.ItemIndex.toString()
lblSelectedProductName.Text="You have selected " + e.CommandArgument
The complete code for this application is shown in Figure 3.75
Figure 3.75 DataList2.aspx
<!— Chapter3\DataList2.aspx —>
<%@ Import Namespace="System.Data" %>
<%@ Import Namespace="System.Data.OleDb" %>
<html><head></head>
<script language="VB" Debug="true" runat="server">
Sub Page_Load(src As Object, e As EventArgs)
If Not IsPostBack Then
bindListControl
End If
End Sub
Sub bindListControl()
Dim myConn As OleDbConnection
Dim myOleDbAdapter As OleDbDataAdapter
Dim connStr, sqlStr As String
Dim myDataSet As New DataSet
connStr="Provider=Microsoft.Jet.OLEDB.4.0;Data Source=D:\Products.mdb"
sqlStr="SELECT ProductId, ProductName, Price " _
+ " FROM Products WHERE Price > 40 ORDER BY Price"
myConn= New OleDbConnection(connStr)
myConn.Open()
myOleDbAdapter=New OleDbDataAdapter(sqlStr,myConn)
myOleDbAdapter.Fill(myDataSet,"dtProducts")
dataList1.DataSource=myDataSet.Tables("dtProducts")
dataList1.DataBind()
myConn.Close()
End Sub
Sub showSelection(s As Object, e As DataListCommandEventArgs)
lblSelectedIndex.Text ="Selected Index is: " + " " + _
e.Item.ItemIndex.toString()
lblSelectedProductName.Text="You have selected " + e.CommandArgument
End Sub
</script>
<form runat="server">
<asp:DataList id="dataList1" gridlines="both" cellpadding="10"
RepeatColumns="3" RepeatDirection="Horizontal"
onItemCommand="showSelection"
runat="server">
<ItemTemplate><asp:LinkButton id="myLinkBtns"
text='<%# Container.DataItem( "ProductName" )%>'
CommandArgument='<%# Container.DataItem( "ProductName" )%>'
runat ="server"/>
</ItemTemplate>
</asp:DataList>
<asp:Label id="lblSelectedProductName" runat="server" ForeColor="Brown"
Font-Size="12pt" Font-Weight="500" Font-Name="Arial Black,Arial"/>
<br>
<asp:Label id="lblSelectedIndex" runat="server" ForeColor="Brown"
Font-Size="12pt" Font-Weight="500" Font-Name="Arial Black,Arial"/>
</form></html>
posted by Mr.Q at 8:35 AM
0 comments
![]()
![]()
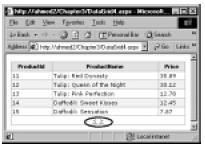
Using RepeatDirection and RepeatColumn Properties of a DataList (Chapter 3)
<asp:DataList id="dataList1" border=0
RepeatDirection="Horizontal" RepeatColumns="3" runat="server">
The remainder of the code for this application, as shown in Figure 3.73, is straightforward.
Figure 3.72 Displaying Data Using RepeatDirection and RepeatColumn Properties
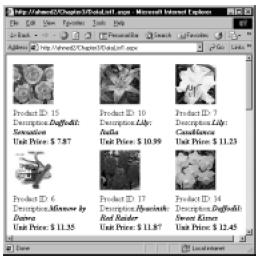
Figure 3.73 Listing of DataList1.aspx
<!— Chapter3\DataList1.aspx —>
<%@ Import Namespace="System.Data" %>
<%@ Import Namespace="System.Data.OleDb" %>
<html><head></head>
<script language="VB" Debug="true" runat="server">
Sub Page_Load(src As Object, e As EventArgs)
If Not IsPostBack Then
bindListControl
End If
End Sub
Sub bindListControl()
Dim myConn As OleDbConnection
Dim myOleDbAdapter As OleDbDataAdapter
Dim connStr, sqlStr As String
Dim myDataSet As New Dataset
connStr="Provider=Microsoft.Jet.OLEDB.4.0;Data Source=D:\Products.mdb"
sqlStr="SELECT ProductId, ProductName, Price, ImagePath " _
+ "FROM Products ORDER BY Price"
myConn= New OleDbConnection(connStr)
myConn.Open()
myOleDbAdapter =New OleDbDataAdapter(sqlStr,myConn)
myOleDbAdapter.Fill(myDataSet,"dtProducts")
dataList1.DataSource=myDataSet.Tables("dtProducts")
dataList1.DataBind()
End Sub
</script>
<body bgcolor="white">
<asp:DataList id="dataList1" border=0
RepeatDirection="Horizontal" RepeatColumns="3" runat="server">
<ItemTemplate><table><tr>
<td> <asp:Image height=80 width=80
ImageURL='<%# Container.DataItem("ImagePath") %>'
runat="server" />
</td></tr><tr>
<td> Product ID:
<%# Container.DataItem("ProductId")%><br>
Description:<b><i><%# Container.DataItem("ProductName")%>
</b></i><br><b>Unit Price: $
<%# Container.DataItem("Price")%></b><br>
</td></tr></table>
</ItemTemplate>
</asp:DataList></body></html>
posted by Mr.Q at 2:28 AM
0 comments
![]()
![]()
Using Event Bubbling and Capturing Events in a Repeater Control (Chapter 3)
Figure 3.70 Event Bubbling in a Repeater Control

The complete code for this application is shown in Figure 3.71. A repeater is essentially a container control.When we defined the repeater, we set its OnItemSelection attribute to a function named “showSelection” as follows:
<asp:Repeater id=repeater1 OnItemCommand="showSelection" runat="server">
Whenever a child control in a repeater raises an event, it will report it to its parent, the repeater.The repeater will fire the showSelection function.This phenomenon of a child reporting an event to its parent is known as Event Bubbling.A Repeater (or any such parent) may receive events from many embedded child controls; hence, it may not clearly identify which of the children raised the event.
Therefore, the child needs to pass certain information about itself when reporting an event.This is accomplished by the second parameter of the event procedure. The second parameter is defined as e As RepeaterCommandEventArgs. Naturally, the parameter e will be of a RepeaterCommandEventArgs object type (data type), and its CommandSource will identify the child raising the event. Similar event bubbling is employed in many cases where a parent control contains child controls.That is how, as shown in the following code excerpt, we are displaying the value of the ProductId in our message:
Sub showSelection(s As Object, e As RepeaterCommandEventArgs)
lblMessage.Text="You have selected ProductID : " _
+ e.CommandSource.Text
End Sub
But, wait a minute! How did we get the ProductId value displayed on a button anyway? Well, that is actually very easy. As shown in the following code excerpt, the button was placed inside the ItemTemplate, and we set its text property to the
“<%# Container.DataItem(“ProductId”)%>”.
<ItemTemplate><tr>
<td>Product ID:
<asp:Button text=<%# Container.DataItem("ProductId")%>
runat="server"/>
</ItmpTemplate
The remainder of the code is self-explanatory.
Figure 3.71 Repeater2.aspx
<!— Chapter3/Repeater2.aspx —>
<%@ Import Namespace="System.Data"%>
<%@ Import Namespace="System.Data.OleDb"%>
<html><head></head>
<script language="VB" Debug="true" runat="server">
Sub Page_Load(src As Object, e As EventArgs)
If Not IsPostBack Then
bindListControl
End If
End Sub
Sub bindListControl()
Dim myConn As OleDbConnection
Dim myOleDbAdapter As OleDbDataAdapter
Dim connStr, sqlStr As String
Dim myDataSet As New Dataset
connStr="Provider=Microsoft.Jet.OLEDB.4.0; " _
+ "Data Source=D:\Products.mdb"
sqlStr="SELECT ProductId, ProductName, Price, ImagePath " _
+ "FROM Products WHERE Price>79.00 ORDER BY Price"
myConn= New OleDbConnection(connStr)
myConn.Open()
myOleDbAdapter =New OleDbDataAdapter(sqlStr,myConn)
myOleDbAdapter.Fill(myDataSet,"dtProducts")
repeater1.DataSource=myDataSet.Tables("dtProducts")
repeater1.DataBind()
End Sub
Sub showSelection(s As Object, e As RepeaterCommandEventArgs)
lblMessage.Text="You have selected ProductID : " _
+ e.CommandSource.Text
' Some references convert the CommandSource object to a button object
' first as shown below. It is not necessary though.
' CType(e.CommandSource, Button).Text
End Sub
</script>
<body><form runat= "server"><center>
<asp:Repeater id=repeater1 OnItemCommand="showSelection" runat="server">
<HeaderTemplate><table></HeaderTemplate>
<ItemTemplate><tr>
<td><asp:Image height=100 width=100
Img src='<%# Container.DataItem("ImagePath") %>' runat="server"/>
</td><td> Product ID:
<asp:Button text=<%# Container.DataItem("ProductId")%>
runat="server"/> <br>Description: <b><i>
<%# Container.DataItem("ProductName")%></b></i><br>
<b>Unit Price:
<%# FormatCurrency(Container.DataItem("Price"))%></b><br>
<td></tr>
</ItemTemplate>
<FooterTemplate></table></FooterTemplate>
</asp:Repeater>
<asp:Label id=lblMessage runat="server" ForeColor="Brown"
Font-Size="14pt" Font-Weight="700" Font-Name="Arial Black,Arial">
</asp:Label></center>
</form></body></html>
posted by Mr.Q at 1:39 AM
0 comments
![]()
![]()
Displaying Data in a Repeater Control (Chapter 3)
Suppose that we want to display our products data for the products that cost more than $45.00.The expected display for this application is shown in Figure 3.68.The code for this application is shown in Figure 3.69.
Figure 3.68 Displaying Data in a Repeater Control
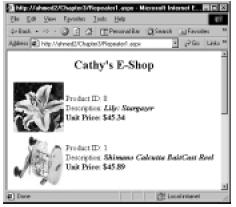
In this application we have defined three templates for our repeater.The Header template starts an HTML table with a <table> tag.The Footer template completes the table with a </table> tag.The ItemTemplate contains the table cells to house the data values.We will extract data from the Products table from the Products.mdb database. First we will populate a data set object, and then we will bind the repeater to this data set. Detailed code for populating the data set and binding the repeater is shown in Figure 3.69.
Figure 3.69 Repeater1.aspx
<!— Chapter3/Repeater1.aspx —>
<%@ Import Namespace="System.Data" %>
<%@ Import Namespace="System.Data.OleDb" %>
<html><head></head>
<script language="VB" Debug="true" runat="server">
Sub Page_Load(src As Object, e As EventArgs)
If Not IsPostBack
bindListControl
End If
End Sub
Sub bindListControl()
Dim myConn As OleDbConnection
Dim myOleDbAdapter As OleDbDataAdapter
Dim connStr, sqlStr As String
Dim myDataSet As New Dataset
connStr="Provider=Microsoft.Jet.OLEDB.4.0;" _
+ "Data Source=D:\Products.mdb"
sqlStr="SELECT ProductId, ProductName, Price, ImagePath " _
+ "FROM Products WHERE Price>45.00 ORDER BY Price"
myConn= New OleDbConnection(connStr)
myConn.Open()
myOleDbAdapter =New OleDbDataAdapter(sqlStr,myConn)
myOleDbAdapter.Fill(myDataSet,"dtProducts")
repeater1.DataSource=myDataSet.Tables("dtProducts")
repeater1.DataBind()
End Sub
</script>
<body><h2><center>Cathy's E-Shop</h2>
<asp:Repeater id="repeater1" runat="server" >
<HeaderTemplate><table></HeaderTemplate>
<ItemTemplate><tr>
<td><asp:Image height=100 width=100
Img src='<%# Container.DataItem("ImagePath")%>'
runat="server"/>
</td>
<td>Product ID:
<%# Container.DataItem("ProductId")%><br>
Description: <b><i>
<%# Container.DataItem("ProductName")%></b><i><br>
<b>Unit Price:
<%# FormatCurrency(Container.DataItem("Price"))%></b><br>
</td></tr>
</ItemTemplate>
<FooterTemplate>
</table>
</FooterTemplate>
</asp:Repeater>
</center></body></html>
Once a data table has been populated, only two statements are required to bind a repeater.We need to set its DataSource property to the appropriate data table, and then we can apply its DataBind() method to accomplish the job.These two statements are as follows:
repeater1.DataSource=myDataSet.Tables("dtProducts").DefaultView
repeater1.DataBind()
We know that the dtProducts table of our data set will contain columns like ProductId, ProductName, etc. Our objective is to develop an ItemTemplate where we want to specify which column should be shown in what format. For each row of the table in the data set, the repeater will employ this template to display the data. A typical way to display a desired field is to use the <%# Container.DataItem(“columnName”)%> syntax. For example, the following ItemTemplate will display the ProductId in a cell of a table (assuming that the <table> tag has been specified in the HeaderTemplate):
<ItemTemplate>
<tr><td><%# Container.DataItem("ProductId") %>
</td></tr>
</ItemTemplate>
Similarly, as shown in the following statement, an Img control can also be specified to render an image:
Img src='<%# Container.DataItem("ImagePath") %>'
posted by Mr.Q at 1:12 AM
0 comments
![]()
![]()