ASP.Net Web Developer Guide |
||||||||
|
||||||||
Sitemap : Content in Chapter 1 |
Content in Chapter 2 |
Content in Chapter 3 |
||||||||
|
||||||||


Wednesday, March 15, 2006
Using VS.Net for Developing a Web Application(Chapter 3)
In this section we will provide a step-by-step procedure to develop a simple Web page using VS.Net. Our finished page will be displayed in the browser as shown in Figure 3.23.
Figure 3.23 The Flower Selection Page Developed Using VS.Net

1. Start a new Visual Basic ASP.NET project as shown in Figure 3.24. Be sure to provide a name for your project.
Figure 3.24 Starting a New VB ASP.NET Web Application

2. After you click OK, the system will display the VS.Net IDE screen. Do not get intimidated by the complex appearance of the screen.With some practice, you will start loving the environment.You will see an empty Web page with two tabs at the bottom: Design and HTML. If the toolbox is not visible, use the View ToolBox of the system menu to display the toolbox. Click on the Web Forms tab of the toolbox.You will see all of the server controls in the toolbox. Draw a Label. If the Property Window is not visible, use F4 (or View Property Window menu) to display the property window of the label. Change its Text property to Select a Flower Please as shown in Figure 3.25.
Please note that the system is building the WebForm1.aspx file automatically for you.
Figure 3.25 The VS.Net IDE Screen

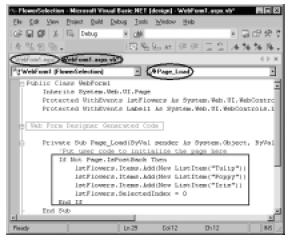
3. Draw a ListBox control. Change its ID property and Rows property lstFlower and 3, respectively.You may also change its background Color and Font to your taste. Be sure to set its AutoPostBack property to True. Now double-click on any empty place of the form.The system will bring the code screen as shown in Figure 3.26. Please note that the
system has already generated the VB Code-Behind. It has named it WebForm1.aspx.vb. In the Page_Load event, enter the necessary code for loading the list box.
4. You are almost done. Go back to the design view of the WebForm1.aspx. Draw a label at the bottom of the list box, and change its ID property to lblMessage. Now double-click the list box.The system will bring the code screen with the template for the lstFlower_SelectedIndexChanged event procedure. Enter the following code in this event:
lblMessage.Text="You have selected " + _
lstFlowers.SelectedItem.Text
Figure 3.26 Code-Behind Screen in VS.Net
You are done. Go ahead and test it. Before you test it, you may use the Build menu to build your project (compile the code), and then use the Start icon or Debug Start of the main menu to run the application. Knowingly or unknowingly, you have developed an ASP.NET Web application.The VS.Net has created a virtual directory in your IIS. If you display the Solution Explorer window, you will see that the VS.Net has done a lot of work for you. By the way, if you look at the HTML code in the WebForm1.aspx file, you will see that VS.Net has styled the list box as follows (only selected attributes are shown):
<asp:ListBox id="lstFlowers" runat="server" Rows="3"
BackColor="#FFE0C0" Font-Bold="True" AutoPostBack="True"
Font-Names="Book Antiqua" Font-Size="Medium" ForeColor="#C04000">
</asp:ListBox>
That means when we develop our .aspx files manually, we can also use these attributes to style our controls.
Figure 3.23 The Flower Selection Page Developed Using VS.Net

1. Start a new Visual Basic ASP.NET project as shown in Figure 3.24. Be sure to provide a name for your project.
Figure 3.24 Starting a New VB ASP.NET Web Application

2. After you click OK, the system will display the VS.Net IDE screen. Do not get intimidated by the complex appearance of the screen.With some practice, you will start loving the environment.You will see an empty Web page with two tabs at the bottom: Design and HTML. If the toolbox is not visible, use the View ToolBox of the system menu to display the toolbox. Click on the Web Forms tab of the toolbox.You will see all of the server controls in the toolbox. Draw a Label. If the Property Window is not visible, use F4 (or View Property Window menu) to display the property window of the label. Change its Text property to Select a Flower Please as shown in Figure 3.25.
Please note that the system is building the WebForm1.aspx file automatically for you.
Figure 3.25 The VS.Net IDE Screen

3. Draw a ListBox control. Change its ID property and Rows property lstFlower and 3, respectively.You may also change its background Color and Font to your taste. Be sure to set its AutoPostBack property to True. Now double-click on any empty place of the form.The system will bring the code screen as shown in Figure 3.26. Please note that the
system has already generated the VB Code-Behind. It has named it WebForm1.aspx.vb. In the Page_Load event, enter the necessary code for loading the list box.
4. You are almost done. Go back to the design view of the WebForm1.aspx. Draw a label at the bottom of the list box, and change its ID property to lblMessage. Now double-click the list box.The system will bring the code screen with the template for the lstFlower_SelectedIndexChanged event procedure. Enter the following code in this event:
lblMessage.Text="You have selected " + _
lstFlowers.SelectedItem.Text
Figure 3.26 Code-Behind Screen in VS.Net

You are done. Go ahead and test it. Before you test it, you may use the Build menu to build your project (compile the code), and then use the Start icon or Debug Start of the main menu to run the application. Knowingly or unknowingly, you have developed an ASP.NET Web application.The VS.Net has created a virtual directory in your IIS. If you display the Solution Explorer window, you will see that the VS.Net has done a lot of work for you. By the way, if you look at the HTML code in the WebForm1.aspx file, you will see that VS.Net has styled the list box as follows (only selected attributes are shown):
<asp:ListBox id="lstFlowers" runat="server" Rows="3"
BackColor="#FFE0C0" Font-Bold="True" AutoPostBack="True"
Font-Names="Book Antiqua" Font-Size="Medium" ForeColor="#C04000">
</asp:ListBox>
That means when we develop our .aspx files manually, we can also use these attributes to style our controls.
posted by Mr.Q at 2:33 AM
![]()
![]()
0 Comments:
Post a Comment
<< Home